Slicing is the first step in the 3D printing process. For most FFF 3D printers the slicer is a piece of software running on a computer outside the 3D printer itself. Your computer. In this chapter we’ll go through the process of downloading, installing, and using the slicer to make a GCode file that the 3D printer can use to create a 3D print.
Downloading the example model
To make this interesting we’re going to use a file that requires some advanced settings to get right. So to start follow this link and download the file that is there:
This is the tornado vase by Alessandro Ranellucci, modified from Martijn Elserman’s original design. This model will work with all slicers and will create a vase… with some clever use of advanced settings.
Downloading your slicer
What slicer you’ll be using may vary. If your 3D printer’s manufacture suggests a slicer or has their own you should probably use that one. If not you’ve got a choice. The most popular slicers right now are: Cura, Slic3r, and Simplify3D. To complicate matters even more there are 2 versions of Cura commonly used, an older version, and Cura 2.
- Cura – https://ultimaker.com/en/products/cura-software/list (look for 15.04.06, the last version before 2
- Cura 2 – https://ultimaker.com/en/products/cura-software
- Slic3r – http://slic3r.org/
- Simplify3D – https://www.simplify3d.com/
If during this chapter one of the slicers has a significant difference from the steps listed it’ll get it’s own section like this one to give separate instructions.
Slic3r Notes
Setting Up for Your Printer
Cura and Cura2 Notes
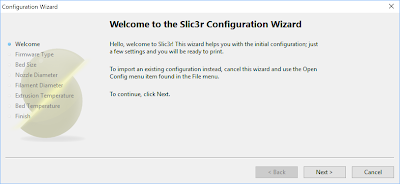
| The first time you run Cura you will be given a wizard with menus to help you set up your printer. Cura comes pre-loaded with profiles for many printers. Simply choose your printer from the list and Cura does the rest. If your printer isn’t on the list you can choose “other” and input the configuration manually. Check with your 3D printer’s manufacturer to find out the specific setting you’ll need to use. |
Slic3r Notes
Slic3r does not have pre-configured printers in it already. Instead, you input the individual settings that pertain to your printer. Check with your 3D printer’s manufacturer to find out the specific setting you’ll need to use.
Simplify3D Notes
| The first time Simplify3D starts up you will see the configuration assistant. (You can get to this any time in Simplify3D from the Help menu.) Simplify3D comes pre-loaded with profiles for many printers. Simply choose your printer from the drop-down menu and Simplify 3D does the rest. If your printer isn’t on the list you can choose “other” and input the configuration manually. Check with your 3D printer’s manufacturer to find out the specific setting you’ll need to use. |
Getting acquainted with Your Slicer
Cura Notes
Cura has the following components on it’s main screen:
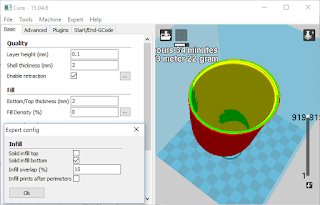
- Virtual Build Space – This gives you a visual representation of where your 3D models will be positioned in your build space. At the top-left are buttons for loading in STLs and saving GCode. At the top-right is the view options. At the bottom are tools for manipulating the selected model including rotating, scaling, and mirroring the model.
- Right-click and drag, rotates the view
- Shift+Right-click and drag, pans the view
- Moving the scroll-wheel zooms the view in and out
- Settings Tabs – Here are the settings for your printer, organized in tabs. All the settings mentioned in the previous chapter can be found here.
- Menu Bar – Other options are available in the menus at the top of Cura
Cura2 Notes
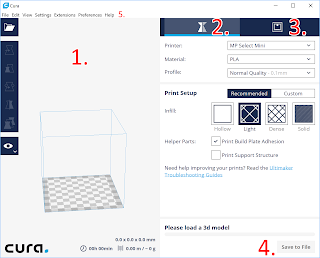
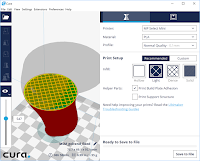
- Virtual Build Space – This gives you a visual representation of where your 3D models will be located and positioned in your build space. On the left are icons for, from top-to-bottom, loading 3D models, manipulating 3D models, and changing the view
- Right-click and drag rotates the view
- Shift+Right-click and drag pans the view
- Moving the scroll-wheel zooms the view in and out
- Print Settings Tab – These are the settings that can be manipulated to alter the print
- Printer Tab – If a printer is connected to your computer via USB, this tab will allow you to access it directly
- Save to File Button – This button saves the GCode output
- Menu Bar – Other options are available in the menus at the top of Cura2
Slic3r Notes
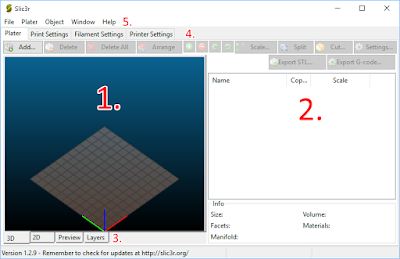
- Virtual Build Space – This gives you a visual representation of where your 3D models will be located and positioned in your build space.
- Left-click and drag to rotate the view
- Right-click and drag to pan the view
- Moving the scroll-wheel zooms the view in and out
- Models List – The list of all 3D models loaded and some information about them. Above this list are buttons to manipulate the 3D models including scale, breaking models into their component parts, and splitting big models up for printing
- Views Tabs – You can switch between the different views of the virtual build space
- Settings Tabs – You can switch between the view of the plate and the settings of the print, filament, and printer
- Menu Bar – Other options are available in the menus at the top of Slic3r
Simplify3D Notes
- Virtual Build Space – This gives you a visual representation of where your 3D models will be located and positioned in your build space.
- Left-click and drag rotates the view
- Right-click and drag pans the view
- Moving the scroll-wheel zooms the view in and out
- Models List – Here is the list of the 3D models you have loaded into Simplify3D for printing. Below the list are buttons for Importing and Removing objects from the build space, as well as a button to automatically arrange the parts on the print bed so they’re not overlapping, called “Center and Arrange”.
- Process List – Simplify3D keeps all the settings you use in a group called a process, and this is Simplify3D’s greatest strength. You can have multiple sets of settings applied to different parts and even have settings apply to only certain layers so they can change as the print goes up. For now we’ll use only one process.
- Object and View Manipulation Tools – These tools allow for quick manipulation of the objects on the build plate and adjusting the 3D view of the Virtual Build space. These tools include selecting, moving, scaling, rotating objects, as well as, further down the tool shelf, direct machine control and customizing supports. Hover over an icon to find out what it does.
- Prepare to Print Button – This is the button you will press when you’re ready to turn the 3D models into GCode.
- Menu Bar – All of Simplify3D functions and many more can also be accessed from the menu bar including some limited mesh manipulation tools.
Loading and Manipulating an STL file
Cura Notes
Cura2 Notes
Slic3r Notes
Simplify3D Notes
Creating the GCode and Previewing the Print
Cura Notes
Cura2 Notes
Slic3r Notes
Simplify3D Notes
- 3D GCode preview – Your model appears as it will when it prints, with the layers, shells, and infill that will be a part of the final print.
- Build Statistics – Information including an estimated time to build the print and how much material will be used.
- Preview Settings – You can change how the preview is displayed and what information is available in the GCode preview.
- Printing Buttons – These buttons will allow you to start a print either over USB or saving the GCode to a file that can be transferred to your printer.
- Layer Scrubbers – These sliders allow a preview of the print mid-process so you can preview that the infill, shells, and everything are just as you want them.
Adjusting the Settings
- Infill = 0%
- Top Layers = 0
- Bottom Layers = 10 or 2mm
- Shells = 4 or 2mm
Cura Notes
- To the left of the 3D view, click the Basic settings tab
- Set Shell thickness (mm) to 2
- Set Bottom/Top Thickness to 2
- Set Fill Density % to 0
- Click on the … button next to the Fill Density % setting
- In the Expert Config menu that pops up uncheck the Solid Infill Top box
Cura2 Notes
- On the right-hand side under Print Setup click the button that says Custom
- Expand the Shell accordion menu
- Change the Wall Thickness to 2
- Change the Top/Bottom Thickness to 2
- Expand the Infill accordion menu
- Change the Infill Density to 0%
- Hover over the Shell accordion menu to make the gear icon appear
- Click the gear icon
- In the Settings Visibility menu that comes up check the Top Thickness and Bottom Thickness check boxes
- Click Close
- Set the Top Thickness setting to 0
Slic3r Notes
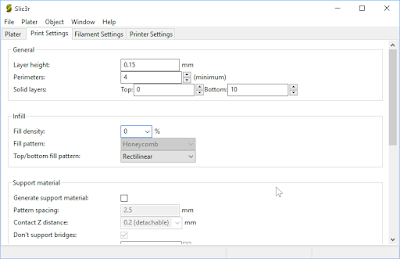
- Click the Print Settings tab
- Under General change the Layer Height to something between 0.2 and 0.1
- Change Perimeters to 4
- Change Solid Layers Top to 0
- Change Solid Layers Bottom to 10
- Under Infill change Fill Density to 0
- Click the Printer tab to go back to Preview mode to verify the changes took place
Simplify3D Notes
- Click the Exit GCode Preview button.
- Click the Edit Process Settings button.
- Move the Infill Percentage slider all the way to the left (0%)
- Click the Show Advanced button.
- Click the Layer tab.
- Set the Top Solid Layers to 0
- Set the Bottom Solid Layers to 6
- Set the Outline/Perimeter Shells to 4
- Click Ok
Printing the Vase
Cura Notes
Cura2 Notes
Slic3r Notes
Simplify3D Notes
Printing over USB vs SD card printing
Printing over USB
Printing from an SD card
The Final Print
Cura2 Notes
This is one area where Cura2 really shines. Every setting you changed from the default has a reset icon next to it, so you never have to question what the recommended setting is and it’s easy to reset back to base.
Conclusion
Controlling your slicer means controlling your 3D printer. It allows you to tune how long a print will take, control how much material you want to use, and other aspects of your model. Sometimes startling results can be achieved by manipulating the settings, like in the case of vase printing. Also, many slicers have advanced features that make them desirable over other slicers, like Cura’s lithophane generation function. Becoming acquainted with those settings will further allow you to become a 3D printing master.
